Hey Everyone,
I know, I am very late in posting this article, as I didn’t get chance to do much hands-on in Rails 4. But now, that we all are on the same page, let me quickly set the summary here.
Most of us (1) have already started with Rails4, most of them (2) are planning to and most of them (3) are still on Rails 3. So my target audience for this post is #2 and #3. Developers working on Rails4, if they wish to provide any comments/suggestions they are most welcome.
Recently, I got a chance to develop a new application in Rails4. There are many articles available online, which will provide you insight about the changeset in Rails4. But my idea is to give a step by step information, as I continue to work on my existing application. Hence, this post will keep updating at regular intervals.
Folks can take the information from here which is relevant to them.
– If you wish to localize your gems (including Rails4), to your application, you must need to run:
After, rails new {APP_NAME}, then your bundle runs. Once it is finished, run this command:
bundle install --path vendor/gems
This command will create a .bundle folder inside your app. If you open this folder, there is a config file, where path of the gems is defined. You don’t need to define the path again and again. This config file will take care of it.
– If you have a pending migration and you’re trying to browse your application, Rails tells you to do a rake db:migrate before you see you app in action. See attached screenshot for more reference.

– Including modules in Rails4: If you wish to include any re-usable module in a common place (say application_controller.rb) from your {Rails.root}/lib folder, then you must need to tell your application to load the path. To do this, type:
config.autoload_paths += %W(#{config.root}/lib)
– Model.find_or_create_by_{COLUMN_NAMES} is deprecated in Rails4. To use it:
Model.where(col_1: SOME_VALUE, col_2: SOME_VALUE).first_or_create
– ActiveRecord::Relation is now changed to #<ActiveRecord::Associations::CollectionProxy []>
– using of conditions while defining associations is no longer supported. Till Rails 3, one can use this syntax:
This file contains bidirectional Unicode text that may be interpreted or compiled differently than what appears below. To review, open the file in an editor that reveals hidden Unicode characters.
Learn more about bidirectional Unicode characters
| class Product < ActiveRecord::Base | |
| has_many :suppliers, conditions: ["suppliers.status = ?", true] | |
| end | |
| # In Rails4, if you wish to use the same, you can use the below syntax: | |
| class Product < ActiveRecord::Base | |
| has_many :suppliers, -> { where("suppliers.status = ?", true) } | |
| end |
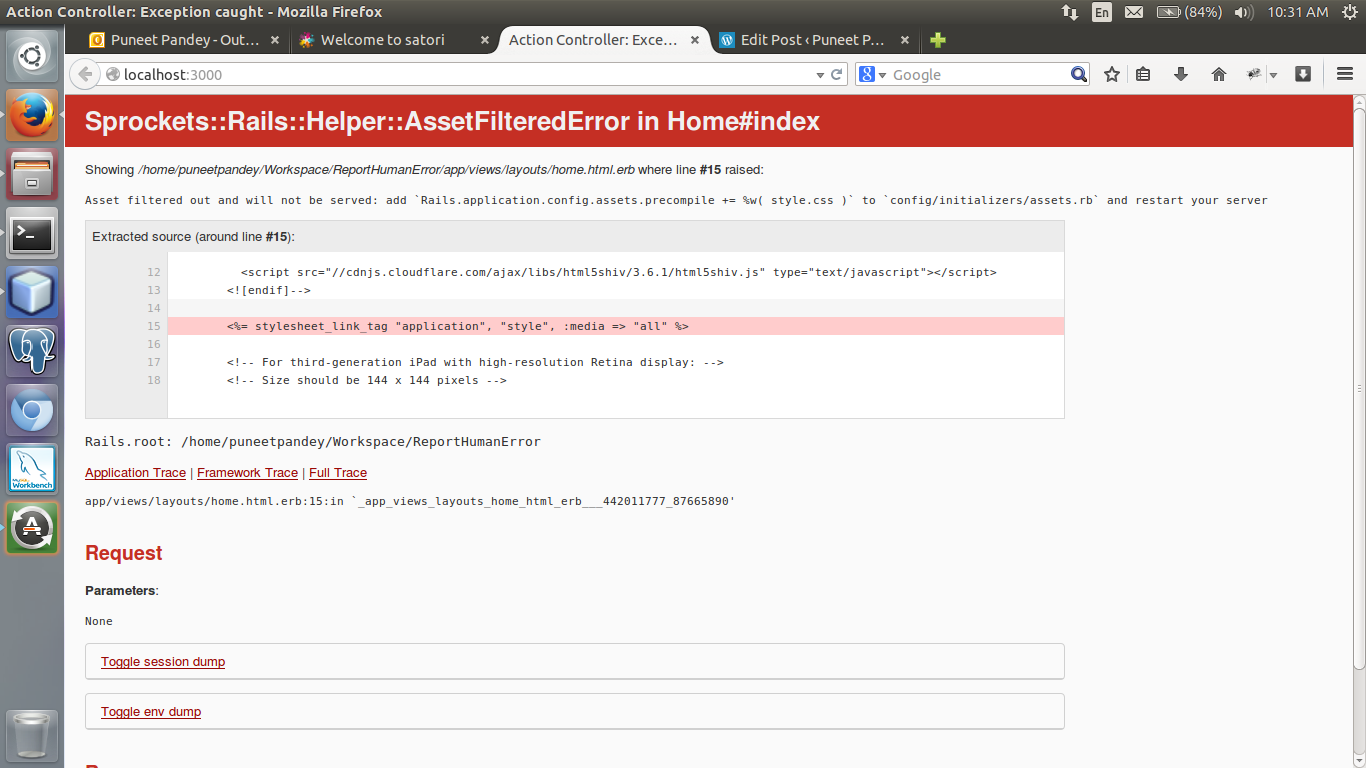
– Adding Stylesheets: If you’re trying to add any stylesheet into layout, You must need to add it under ‘config/initializers/assets.rb’
Rails4 shows it in a very beautiful way (refer to the attached screenshot)
– ActionMailer: deliver_now & deliver_later: Action Mailer is now integrated with Active Job so that you can send emails outside of the request-response cycle, hence the user doesn’t have to wait for the request to complete.
However, if you wish to send the mail straightaway, use deliver_now.
UserMailer.welcome_mail(@user).deliver_later

UserMailer.welcome_mail(@user).deliver_now
