MailChimp API reference guide – Part I of III

Hello Folks,

In this introductory article I will walk you through the steps on how to Add your contacts to MailChimp

I am not going to elaborate / explain about MailChimp here. I am assuming you have basic knowledge about MailChimp (What it does, Why you need it etc.) and you would like to explore / integrate MailChimp to your project.

In the second part of this article, we will see how to:

  • Add a tag to a MailChimp contact
  • Delete a tag to a MailChimp contact

In the third part of this article, I am going to show how you can send your E-commerce purchases to MailChimp.

Prerequisites:

  1. A MailChimp account
  2. Basic knowledge of Ruby programming language
  3. MailChimp API Key (Obtain it from here: https://mailchimp.com/help/about-api-keys/#Generate_an_API_key)
  4. MailChimp Audience ID (Obtain it from here: https://mailchimp.com/help/find-audience-id/)

Let’s code it!

1. Add some base before adding a contact or assign a tag

require 'uri'
require 'net/http'
require 'resolv-replace'

module MailchimpUserApi
  class MailchimpIntegration
    def initialize *args
      base_data_center = 'us2'
      @base_uri = 'https://' + base_data_center + '.api.mailchimp.com/3.0/'
      @base_setup = {
        api_key: YOUR_MAILCHIMP_API_KEY,
        list_id: YOUR_MAILCHIMP_AUDIENCE_ID
      }
    end

    def make_a_get_request_with uri
      req = Net::HTTP::Get.new(uri.to_s)
      req.basic_auth 'anystring', @base_setup[:api_key]
      response = nil

      Net::HTTP.start(uri.host, uri.port, :use_ssl => uri.scheme == 'https', read_timeout: 60, max_retries: 3) do |http|
        response = http.request req
      end
      response = JSON.parse(response.body)
      return response
    end

    def make_a_post_request_with uri, request_body
      req = Net::HTTP::Post.new(uri.to_s)
      req.body = request_body.to_json
      req.basic_auth 'anystring', @base_setup[:api_key]
      response = nil

      Net::HTTP.start(uri.host, uri.port, :use_ssl => uri.scheme == 'https', read_timeout: 60, max_retries: 3) do |http|
        response = http.request req
      end
      return response
    end

    def endpoint_for?(action, params = nil)
      available_endpoints = {
        contact_presence: @base_uri + "lists/" + @base_setup[:list_id] + "/members/" + (params.nil? ? '' : params),
        add_contact: @base_uri + "lists/" + @base_setup[:list_id] + "/members/",
        update_contact: @base_uri + "lists/" + @base_setup[:list_id] + "/members/" + params.to_s,
        all_or_create_segments: @base_uri + "lists/" + @base_setup[:list_id] + "/segments",
        list_segments: @base_uri + "lists/" + @base_setup[:list_id] + "/segments?count=200",
        add_remove_tag_contact: @base_uri + "lists/" + @base_setup[:list_id] + "/segments/" + (params.nil? ? '' : params),
      }

      begin
        uri = URI.parse available_endpoints[action]
      rescue URI::InvalidURIError
        uri = URI.parse(URI.escape(available_endpoints[action]))
      end

      return uri
    end
  end
end

Here’s what we have done so far:

  • Created a base class and initialized it with all configurations
  • Created GET and POST HTTP methods
  • Created a method with all endpoints mailchimp has and that we will hit to send data to MailChimp

2. Let’s add some code to add a user to MailChimp

require 'uri'
require 'net/http'
require 'resolv-replace'

module MailchimpUserApi
  class Contact < MailchimpIntegration
    def initialize(user)
      @user = user
      @email_lookup_hash = Digest::MD5.hexdigest @user["email"].downcase
      super
    end

    def add
      exist, resp = contact_already_present?
      return true if exist
      return create_contact
    end

    def create_contact(opts={})
      uri = endpoint_for?(:add_contact)
      request_body = request_hash

      response = make_a_post_request_with uri, request_body
      return response.code.eql?("200")
    end

    def request_hash
      request_body = {
        "email_address" => @user["email"].downcase,
        "status" => "subscribed"
      }

      if @user["name"].present?
        request_body = request_body.merge({
          "merge_fields" => {
            "FNAME" => @user["name"].split(" ")[0],
            "LNAME" => @user["name"].split(" ").drop(1).join(" "),
            "COMPANY" => @user["company_name"].to_s
          }
        })
      end

      request_body
    end

    def contact_already_present?
      uri = endpoint_for?(:contact_presence, @email_lookup_hash)
      response = make_a_get_request_with uri
      return false, nil if response["status"].eql?(404)
      return true, response
    end
  end
end

Here’s what we are doing:

  1. Initialize the `Contact` class with user’s email address
  2. Before adding the contact to MailChimp, we are first checking if the contact exists. If not then only add the contact.
  3. To test this, here’s what you can do from irb or console:
user = {email: "john_smith@example.com", name: "John Smith", company_name: "Website Builder"}
contact = MailchimpUserApi::Contact.new(user)
contact.add
#or
contact.contact_already_present?

Hope that helps! Implementation is straightforward.

Happy Coding!
Connect to Box Explorer Component using Ruby on Rails

Hello Everyone,

The target audience of this post is limited.

In this article of mine, I will write down the steps of how you can connect with Box Explorer Component to allow users to upload file into your Box account.

Requirement: We want to allow our users to upload file to somewhere in the cloud where we (me and my team) can see the files and take further actions on it

There are many solutions to this: You have AWS S3, DropBox, Google Cloud and lots more but if you do not want to spend much time on designing and engineering the front-end (by designing I mean building the entire UI for file management), you can use Box.com’s easy to integrate Box Explorer Component.

Related links:

  1. https://developer.box.com/guides/embed/ui-elements/explorer/
  2. https://app.box.com/developers/console
  3. https://app.box.com/master
  4. https://github.com/box-community/samples-docs-authenticate-with-jwt-api/blob/master/sample.rb

Prerequisites:

  1. Ruby >= 2
  2. Rails >= 5
  3. A Box.com account
  4. A Box.com App – You can create the same from Developer’s console (see Related links#2)
  5. Make sure your app is authorised. You can do the same from here: https://app.box.com/master/custom-apps
  6. A config.json file that you can download from: https://app.box.com/developers/console/app/:app_id/configuration. You’ll have to generate Public/Private keypair for this – You can do the same from the same page.
  7. You’ll have to add your domain to allowed origins via above link.

Sample Output / Demo: https://codepen.io/box-platform/pen/wdWWdN. In addition you’ll also see options to add / upload file / folder and perform operations like Search for uploads, Download, Share, Delete etc.

Once you are done setting up above things, let’s code this:

# lib/box_api.rb
require 'json'
require "openssl"
require 'securerandom'
require 'jwt'
require 'json'
require 'uri'
require 'net/https'

class BoxApi
  def initialize unique_identifier = nil
    @unique_identifier  = unique_identifier
    @access_token       = Rails.cache.fetch("users/#{@unique_identifier}/box/access_token")
  end

  def get_token
    return @access_token unless @access_token.nil?

    set_auth
    # Make the request
    uri = URI.parse(@authentication_url)
    http = Net::HTTP.start(uri.host, uri.port, use_ssl: true)
    request = Net::HTTP::Post.new(uri.request_uri)
    request.body = @params
    response = http.request(request)

    # Parse the JSON and extract the access token
    @access_token = Rails.cache.fetch("users/#{@unique_identifier}/box/access_token", expires_in: 60.minutes) do
      JSON.parse(response.body)['access_token']
    end
    return @access_token
  end

  def find_or_create_folder_by_folder_name folder_name = @unique_identifier
    root_folder     = find_folder "Client Uploads"
    root_folder     = create_folder "Client Uploads" if !root_folder
    child_folder    = find_folder folder_name, root_folder["id"]
    child_folder    = create_folder folder_name, root_folder["id"] if !child_folder

    return child_folder["id"]
  end

  def find_folder folder_name, parent_folder_id = nil
    base_url = "https://api.box.com/2.0/search?query='#{folder_name}'&type=folder"
    base_url += "&ancestor_folder_ids=#{parent_folder_id}" if parent_folder_id

    uri = URI.parse(base_url)
    request = Net::HTTP::Get.new(uri)
    request["Authorization"] = "Bearer #{@access_token}"

    req_options = {
      use_ssl: uri.scheme == "https",
    }

    response = Net::HTTP.start(uri.hostname, uri.port, req_options) do |http|
      http.request(request)
    end

    response_body = JSON.parse(response.body)

    return false if response_body["total_count"] == 0 && response_body["entries"].empty?
    return response_body["entries"][0]
  end

  def create_folder folder_name, parent_folder_id = nil
    uri = URI.parse("https://api.box.com/2.0/folders")
    request = Net::HTTP::Post.new(uri)
    request.content_type = "application/json"
    request["Authorization"] = "Bearer #{@access_token}"

    params = {}
    params["name"] = folder_name
    params["parent"] = {
      "id" => parent_folder_id ? parent_folder_id : "0"
    }

    request.body = JSON.dump(params)

    req_options = {
      use_ssl: uri.scheme == "https",
    }

    response = Net::HTTP.start(uri.hostname, uri.port, req_options) do |http|
      http.request(request)
    end

    response_body = JSON.parse(response.body)
    return response_body if response.code == "201"
  end

private
  def set_auth
    @config = JSON.parse(
      File.read("#{Rails.root.join}/config/box_config.json")
    )
    @config = Rails.env.production? ? @config["production"] : @config["base"]
    @appAuth = @config['boxAppSettings']['appAuth']
    key = OpenSSL::PKey::RSA.new(
      @appAuth['privateKey'],
      @appAuth['passphrase']
    )
    @authentication_url = 'https://api.box.com/oauth2/token'
    claims = {
      iss: @config['boxAppSettings']['clientID'],
      sub: @config['enterpriseID'],
      box_sub_type: 'enterprise',
      aud: @authentication_url,
      # This is an identifier that helps protect against
      # replay attacks
      jti: SecureRandom.hex(64),
      # We give the assertion a lifetime of 45 seconds
      # before it expires
      exp: Time.now.to_i + 45
    }
    keyId = @appAuth['publicKeyID']

    # Rather than constructing the JWT assertion manually, we are
    # using the pyjwt library.
    # The API support "RS256", "RS384", and "RS512" encryption
    assertion = JWT.encode(claims, key, 'RS512', { kid: keyId })

    # We are using the excellent axios package
    # to simplify the API call
    @params = URI.encode_www_form({
      # This specifies that we are using a JWT assertion
      # to authenticate
      grant_type: 'urn:ietf:params:oauth:grant-type:jwt-bearer',
      # Our JWT assertion
      assertion: assertion,
      # The OAuth 2 client ID and secret
      client_id: @config['boxAppSettings']['clientID'],
      client_secret: @config['boxAppSettings']['clientSecret']
    })
  end
end

Let’s call this api via controller’s method: `/app/controllers/home_controller.rb`

# /app/controllers/home_controller.rb
class HomeController < ApplicationController
  def connect_to_box
    api        = BoxApi.new(user.company.name)
    token      = api.get_token
    folder_id  = api.find_or_create_folder_by_folder_name

    respond_to do | wants |
      wants.json do
        render json: {
          success: true,
          access_token: token,
          folder_id: folder_id
        }
      end
    end
  end
end

and finally let’s load token and folder_id via Ajax call from view

/app/views/home/files.html.erb

<%= content_for :page_css do %>
  <link rel="stylesheet" href="https://cdn01.boxcdn.net/platform/elements/13.0.0/en-US/explorer.css" />
<% end %>

<%= content_for :page_js do %>
  <!-- polyfill.io only loads the polyfills your browser needs -->
  https://cdn.polyfill.io/v2/polyfill.min.js?features=es6,Intl
  https://cdn01.boxcdn.net/platform/elements/13.0.0/en-US/explorer.js
<% end %>

<div class=<%= "#{controller_name}_#{action_name}" %>>
  <div id="uploader-panel" class="box-light-blue">
    <div class="container">
      <div class="row">
        <div class="col-md-12">
          <div class="text-center result-overlay">
            <%= image_tag 'pageloader.svg' %>
          </div>
          <div class="box-list-container" style="width: 100%; height: 100%; margin: 0; padding: 0; min-width: 320px;"></div>
        </div>
      </div>
    </div>
  </div>
</div>

<script type="text/javascript">
  $(document).ready(function() {
    //connecting to box to fetch required token and folder
    $.ajax({
      url: '/home/connect_to_box',
      type: 'POST',
      dataType: 'json',
      success: function(response) {
        if(response['success'] === true){
          $("div.result-overlay").hide();
          const folderId = response['folder_id'];
          const accessToken = response['access_token'];
          const logoUrl = "<%= asset_path('logo-blue.jpg') %>";
          const contentExplorer = new Box.ContentExplorer();

          // for more options visit: https://developer.box.com/guides/embed/ui-elements/uploader/#options
          contentExplorer.show(folderId, accessToken, {
            container: ".box-list-container",
            canDownload: true,
            canUpload: true,
            canCreateNewFolder: true,
            sortBy: "date",
            sortDirection: "DESC",
            logoUrl: logoUrl,
            onClose: null
          });

          contentExplorer.on('upload', (data) => {
            //notify via slack
            $.ajax({
              url: '/home/upload_notify',
              type: 'POST',
              beforeSend: function(xhr) {xhr.setRequestHeader('X-CSRF-Token', $('meta[name="csrf-token"]').attr('content'))},
              dataType: "json",
              data: {files: JSON.stringify(data)}
            });
          });

          contentExplorer.on('error', (data) => {
            alert(`Error uploading file with name "${data.file.name}". The error was: "${data.error}"`);
          });
        }
      }
    })
  });
</script>

Here’s what’s happening:

  1. When the page loads we are firing Ajax call to get access_token and folder_id from Box. folder_id is the ID of the folder where the user will upload all files. We are giving different folder for each user who belongs to different company (see table below).
  2. The call to Box API checks if the access token is present for the company, it will return that else it will connect to Box, get the access token, set the cache and return the token – Important thing to note that the token returned from Box is valid for 60 minutes
  3. Based on the returned token, we will check if the folder is present for the company’s user or not!
  4. The last part of the Ajax call I have written will send the slack notification.
UserCompany NameFolder on Box
User-AABCABC
User-BXYZXYZ
User-CABCABC
User-DA123A123

That’s it. Hook it up and see it in action.

How to keep multiple versions of Elasticsearch on MacOS

Hello Folks,

Hope you are keeping safe!

This article is very short and simple. I was struggling to have multiple versions of Elasticsearch on my local Mac machine. With `homebrew` service, I wasn’t able to install multiple versions of Elasticsearch and I don’t want to move away from brew. So, I have decided to work on the alternate.

Here’s are the steps:

* If you have elasticsearch installed with brew command. Keep it as-is
* Stop elasticsearch service.

$ brew tap homebrew/services
$ brew services list
$ brew services stop elasticsearch-full # that's my case. Yours will be different
==> Successfully stopped `elasticsearch-full` (label: homebrew.mxcl.elasticsearch-full)
# now if you try to curl localhost:9200
$ curl http://localhost:9200
curl: (7) Failed to connect to localhost port 9200: Connection refused
  • Install evm (ElasticSearch Version Manager) from: https://github.com/duydo/evm
  • Install elasticsearch@7.4 with evm install 7.4.0
  • Start elasticsearch: evm start
  • Try hitting the curl request and you should see version 7.4.0
  • If you want to run previous version (that you’ve installed with Homebrew), simply run: evm stop  and then run brew services start elasticsearch-full

Thankful to: https://github.com/duydo/evm

Hope that helps!

[Rails 6] Using bootstrap with Asset Pipeline or Webpacker

I am working on a sample POC in Rails 6 and came across various articles that shows how can we use bootstrap with Webpacker and host all the js, css and images under /app/javascript folder (Whether we are using app like JS or not).

I am not using this Rails 6 PoC for any JS frameworks (like React) for now. This is my simple web application and I would like to have my javascripts remain at /app/javascript folder and my css and images to stay at /app/assets folder. To summarise, I would like to use both Webpacker (for JS compilation) and Asset Pipeline for CSS and images compilation.

I tried the first approach where Webpacker is handling all the JS, CSS and Images but somehow I dislike the idea and the folder naming convention where everything lies under /app/javascript. For e.g. all css files are under /app/javascript/stylesheets and images are under /app/javascript/images and most importantly I am not building app like javascript. Then I sat down and thought for a while and came up with below points:

  1. If it’s my Web app, why can’t I handover the control (of CSS and images) to Asset Pipeline and let it handle everything like it was doing in earlier versions of Rails.
  2. I am trying to mix the concepts of both Webpacker and Asset Pipeline to achieve what I want — which is incorrect.
  3. How can I Integrate newly integrated Trix editor and add Bootstrap features like Modal/AutoComplete etc. with both?
  4. Let’s say I have 3 types of Users in my PoC (i) User, (ii) Client and (iii) Admin. User and Admin will use the Web App (everything controlled by Asset Pipeline and Webpacker both) and for Client — there will be a React App (controlled only by Webpacker) — Is it possible?

Well enough theory for now. Let’s see some code in action:

1st Approach: Using Asset Pipeline for bootstrap + Using Webpacker for jQuery & Trix Editor + Using Bootstrap – Modal


# Gemfile
gem 'webpacker', '~> 4.0'
gem 'bootstrap', '~> 4.3.1'
gem 'jquery-rails'
gem 'trix-rails', require: 'trix'

# /app/assets/stylesheets/application.scss
@import 'bootstrap';
@import 'trix';
@import './_custom.scss' // this is my customise css

# from console
# $ yarn add bootstrap jquery popper.js trix
# then check package.json to verifiy the same

# /app/javascript/application.js
require("bootstrap/dist/js/bootstrap")
require("trix")
require("jquery")

# config/webpacker.yml
# Uncomment resolved_paths: ['app/assets']

# under config/webpack/environment.js
# replace everything with the content below:
const { environment } = require('@rails/webpacker')
const webpack = require('webpack')

environment.plugins.append(
  'Provide',
  new webpack.ProvidePlugin({
    $: 'jquery',
    jQuery: 'jquery',
    Popper: ['popper.js', 'default']
  })
)
module.exports = environment

# Inside app/views/layouts/application.haml (or ERB whichever)
= stylesheet_link_tag 'application', media: 'all', 'data-turbolinks-track': 'reload'
= javascript_pack_tag 'application', 'data-turbolinks-track': 'reload'


With above settings in place you can use bootstrap CSS, bootstrap features like Modal, autocomplete, jQuery (defined in /app/javascript)

The only disadvantage I can see in this approach is – repetitive code. I am using bootstrap, trix and jQuery for Asset Pipeline (via Gemfile) as well as for Webpacker (via yarn)


I am all ears to know, if there a way to deal with this situation

Now what if, we have to add react to it? I will soon publish a second part of this article covering this case.


Happy Coding!

Requests that take more than 60s to complete fails – ElasticBeanstalk

This short post specifically targets:
– RoR as web development environment – Can be ignored as this is closely related to nginx configuration settings
Nginx as web server


While working with ElasticBeanstalk environments, one of my requirement was to send a heavy job to Worker App that takes > 1 min (60 seconds) to complete and I had no configuration in place. The way beanstalk-app was handling that job was disappointing. That job never finishes within a minute and another job (duplicate) gets triggered by the app and this goes on till it reaches the max retry count.

I tried googling the solution and found that we have to increase the timeout for the web server which is handling the request. In my case it was `nginx`.

So I decided to write a config file under `.ebextensions/02_nginx_proxy.config` — I am not going into the details of `ebextensions` here as this is out of scope of this article.

Here’s how my config file looks like:


client_max_body_size 30M;
proxy_send_timeout 600;
proxy_read_timeout 1h;
send_timeout 600;
upstream backend {
server unix:///var/run/puma/my_app.sock ;
}
server {
listen 80;
access_log /var/log/nginx/access.log;
error_log /var/log/nginx/error.log;
server_name *.cmgresearch.net;
large_client_header_buffers 8 32k;
location / {
proxy_set_header X-Real-IP $remote_addr;
proxy_set_header X-Forwarded-For $proxy_add_x_forwarded_for;
proxy_set_header Host $http_host;
proxy_set_header X-NginX-Proxy true;
proxy_buffers 8 32k;
proxy_buffer_size 64k;
proxy_pass http://backend;
proxy_redirect off;
location /assets {
root /var/app/current/public;
}
# enables WS support
location /cable {
proxy_pass http://backend;
proxy_http_version 1.1;
proxy_set_header Upgrade "websocket";
proxy_set_header Connection "Upgrade";
proxy_set_header X-Real-IP $remote_addr;
proxy_set_header X-Forwarded-For $proxy_add_x_forwarded_for;
}
}
}

Here if you focus on lines:
`proxy_send_timeout 600;`
`proxy_read_timeout 1h;`
`send_timeout 600;`

This will prevent sending multiple requests of same job type until the current one finishes in 1h.

If you need any inputs on what other lines are all about/doing, then leave your comment.

Happy Coding!

Configure Delayed Job with Elastic Beanstalk

Recently, I got a chance to work with Elastic Beanstalk and trust me, it is not as friendly as Heroku and it took me a little while to get used to with Beanstalk deployments.

I am using delayed_job in my project and the requirement was very simple, i.e. to automate background jobs. On heroku we simply add a worker dyno and jobs start working immediately. But, same is not the case with Beanstalk. I came across with various article where people suggested to add a shell script inside `.ebextensions` but I did not find this a full proof solution. Then my colleague suggested me to try `active_elastic_job` @ https://github.com/tawan/active-elastic-job

I find this gem extremely helpful and the installation instructions are super simple.

In this article, I will not dig into how to configure, install and start using this gem (because if you visit the link, the steps are defined in simplest form and should not block you). My idea, is to highlight/cover the areas which are not mentioned there or missing.

1. When you create a worker environment, skip selecting the RDS section (which means you’ll create your worker environment without a RDS DB).

2. Now you’ll have to use the existing database (which your web environment is using). For that, copy all RDS environment variables from web environment to your worker environment.

3. Once above is done, deploy your the code to your worker environment. In case your deployment fails with reason:


PG::ConnectionBad: could not connect to server: Connection timed out

Then, go to Services ~> Elastic Beanstalk ~> You Web Application ~> Configuration ~> Instances ~> Modify and note down the Security Group there (using new UI of Beanstalk)

Now, go to Services ~> Elastic Beanstalk ~> Your worker application ~> Configuration ~> Instances ~> Modify and check the security group which your Web Application is using (Note that you can check as many as you want) and Save your changes. This should allow your worker app to use the same DB.

4. Once you have successfully deployed and configured your worker app and you get:


ActiveJob::QueueAdapters::ActiveElasticJobAdapter::SerializedJobTooBig
The job contains bytes in its serialzed form, which exceeds the allowed maximum of 262144 bytes imposed by Amazon SQS

That means you are not allowed to send more than 256KB of data to delayed job. This could prove a bottleneck and you’ll have to think of a workaround to deal with this error. Although, folks on internet suggested that we could use Amazon Extended Client Library for JAVA @ https://github.com/awslabs/amazon-sqs-java-extended-client-lib but I wasn’t able to use and apply this in my Rails app.

Having said that, if anyone knows how to use this in Rails, please drop a comment or as an alternate try to send data < 256KB to SOS queue

That’s all I have for now. See you soon! Happy Coding. 🙂

[Ruby]: Update hash values with Array

Hi Folks,

In this small tutorial, I am writing a program that updates value of each element in hash with a given array values.
Given that:
h = { h1: 'value1', h2: 'value2', h3: 'value3', h4: 'value4' }
a = [ '1', '2', '3', '4' ]
Where h is a Hash and a is an Array

Output we would like to achieve here is:
h = { h1: 'value1_1', h2: 'value2_2', h3: 'value3_3', h4: 'value4_4' }

Let’s code it:

h = { h1: 'value1', h2: 'value2', h3: 'value3', h4: 'value4' }
a = [ '1', '2', '3', '4' ]

h.each_with_index do |(k, v), i|
break if a.size > h.keys.size

a.each_with_index { |val, index|
if i == index
h[k] = v.to_s + ‘_’ + val.to_s
end
}
end

p h.inspect
# Output => h = { :h1 => “value1_1”, :h2 => “value2_2”, :h3 => “value3_3”, :h4 => “value4_4” }


class MyLittleProgram
def execute
h = { h1: 'value1', h2: 'value2', h3: 'value3', h4: 'value4' }
a = [ '1', '2', '3', '4' ]
h.each_with_index do |(k, v), i|
break if a.size > h.keys.size
a.each_with_index { |val, index|
if i == index
h[k] = v.to_s + '_' + val.to_s
end
}
end
end
end
e = MyLittleProgram.new
p e.execute
# Output => h = { :h1 => "value1_1", :h2 => "value2_2", :h3 => "value3_3", :h4 => "value4_4" }

I’ve tried to minimize the number of loops here. Appreciate your feedback and suggestions.

Happy Coding! 🙂

Learning RSPEC with Rails 4 (Alpha)

Hi Folks,

Hope you all are fine and doing good! I am sure most of you, are using TDD for years now. And, once we think of TDD, the first thing comes into our mind is, RSPEC. We all agree that Rspec is a great framework of Test-Driven-Development and its integration with other libraries (like fixtures etc.) is seamless.

With rapid revolution happening in Rails community, Rspec too has evolved over the years, and my motto is to bring this newly developed RSPEC framework in such a way so that, those who are eager to learn TDD can take tips and take this as a learning material. And those, who are planning to migrate can refer to this!

Environments I am using:

  • Ruby 2.1.2
  • Rails 4.2.1
  • Rspec 3.2.0

Idea is to share small code snippets while learning these changes, where we see: what is new. So let’s explore this now:

1. In Rspec 3, the support for ‘should‘ (e.g. foo.should == bar) is deprecated and is no longer supported. Instead of ‘should’, rspec encourages us to use ‘expect‘. Let’s see how it works:


require 'spec_helper'
class User
def initialize(args = {}); end
def email
'someone@example.com'
end
def mobile
12021679918
end
end
describe User do
describe "#initialize with old should way" do
it "should set the email and mobile for user" do
u = User.new email: 'someone@example.com', mobile: 12021679918
u.email.should == 'someone@example.com'
u.mobile.should == 12021679918
end
end
describe "#initialize with new expect way" do
it "expects email and mobile param for user" do
u = User.new email: 'someone@example.com', mobile: 12021679918
expect(u.email).to eq('someone@example.com')
expect(u.mobile).to eq(12021679918)
end
end
end

view raw

user_spec.rb

hosted with ❤ by GitHub

If you try running this example, you’ll get this deprecation warning message:

Deprecation Warnings:

Using `should` from rspec-expectations‘ old `:should` syntax without explicitly enabling the syntax is deprecated. Use the new `:expect` syntax or explicitly enable `:should` with `config.expect_with(:rspec) { |c| c.syntax = :should }` instead


Now, let’s take an example of controller spec. Create a controller with scaffold and write the spec as below:


# Controller /app/controllers/posts_controller.rb
def index
@posts = Post.all
end
# Spec /spec/controllers/posts_controller_spec.rb
describe "GET #index" do
it "responds successfully with a HTTP 200 status code" do
get :index
expect(response).to be_success
expect(response).to have_http_status(200)
end
it "should render index template" do
get :index
expect(response).to render_template('index')
end
end
# Controller /app/controllers/posts_controller.rb
def create
@post = Post.new post_params
respond_to do |format|
if @post.save
format.html { redirect_to @post }
else
format.html { render action: :new }
end
end
end
# Spec /spec/controllers/posts_controller_spec.rb
describe "POST #create" do
it "should create new post with valid params" do
post :create, post: { title: 'My First Post', description: 'My first post description' }
expect(Post.count).to eq(1)
end
it "redirects to show page once the post is created successfully" do
post :create, post: { title: 'My First Post', description: 'My first post description' }
expect(response).to redirect_to(Post.first)
end
it "does not allow to create post without title" do
post :create, post: { description: 'My first post description' }
expect(Post.count).to eq(0) # This make sure validates :title, presence: true in post.rb
end
it "renders new template if failed to create post" do
post :create, post: { description: 'My first post description' }
expect(response).to render_template('new')
end
end
# Controller /app/controllers/posts_controller.rb
def update
@post = Post.find params[:id]
respond_to do |format|
if @post.update_attributes(post_params)
format.html { redirect_to @post }
else
format.html { render action: :edit }
end
end
end
# Spec /spec/controllers/posts_controller_spec.rb
describe "PUT update/:id" do
before(:each) do
@post = FactoryGirl.create(:post)
end
it "should render edit template if unable to create post" do
@attr = { title: nil, description: 'My first post description' }
put :update, id: @post.id, post: @attr
expect(response).to render_template('edit')
end
it "redirects user on show post page" do
@attr = { title: 'My First Post', description: 'My first post description' }
put :update, id: @post.id, post: @attr
expect(response).to have_http_status(302)
expect(response).to redirect_to(@post)
end
it "validates the title and description of post after updation" do
@attr = { title: 'My 1st Post', description: 'My 1st post description updated' }
put :update, id: @post.id, post: @attr
@post.reload
expect(@post.title).to eql(@attr[:title])
expect(@post.description).to eql(@attr[:description])
end
end

I’ll cover model, helper and view spec very soon.

Happy Coding 🙂

[Ruby] Fetching Emails from Microsoft Outlook

Hi Folks,

Hope everyone is fine and doing good. In this article of mine, I am going to narrate, how you can fetch Emails from your Microsoft Outlook account. I am only going to cover ‘Inbox‘ here. However, the scope of library (Gem) is very vast and you can customize this as per your need.

PREREQUISITE:

  • Ruby
  • ViewPoint Gem: gem install viewpoint

For Debugging, I am using viewpoint/logging/config


require 'rubygems'
require 'viewpoint' # Library for MS Outlook
require 'viewpoint/logging/config' # For Debugging
include Viewpoint::EWS
endpoint = 'YOUR MS EXACHANGE URL COMES HERE' # E.g. https://OUTLOOKSERVER_URL/ews/exchange.asmx
user = 'USERNAME'
pass = 'PASSWORD'
cli = Viewpoint::EWSClient.new endpoint, user, pass
folders = cli.folders
p folders[0].inspect
inbox = cli.get_folder_by_name 'Inbox'
items = inbox.items
p items[0].body.inspect
p items.count

view raw

outlook.rb

hosted with ❤ by GitHub

Hope this helps someone! Keep in touch and Happy Coding 🙂

Puneet

Rails 4: Changeset

Hey Everyone,

I know, I am very late in posting this article, as I didn’t get chance to do much hands-on in Rails 4. But now, that we all are on the same page, let me quickly set the summary here.

Most of us (1) have already started with Rails4, most of them (2) are planning to and most of them (3) are still on Rails 3. So my target audience for this post is #2 and #3. Developers working on Rails4, if they wish to provide any comments/suggestions they are most welcome.

Recently, I got a chance to develop a new application in Rails4. There are many articles available online, which will provide you insight about the changeset in Rails4. But my idea is to give a step by step information, as I continue to work on my existing application. Hence, this post will keep updating at regular intervals.

Folks can take the information from here which is relevant to them.

– If you wish to localize your gems (including Rails4), to your application, you must need to run:

After, rails new {APP_NAME}, then your bundle runs. Once it is finished, run this command:
bundle install --path vendor/gems

This command will create a .bundle folder inside your app. If you open this folder, there is a config file, where path of the gems is defined. You don’t need to define the path again and again. This config file will take care of it.

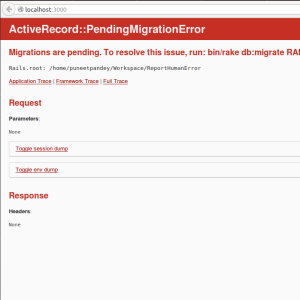
– If you have a pending migration and you’re trying to browse your application, Rails tells you to do a rake db:migrate before you see you app in action. See attached screenshot for more reference.

Pending Migration Rails4

Including modules in Rails4: If you wish to include any re-usable module in a common place (say application_controller.rb) from your {Rails.root}/lib folder, then you must need to tell your application to load the path. To do this, type:
config.autoload_paths += %W(#{config.root}/lib)

Model.find_or_create_by_{COLUMN_NAMES} is deprecated in Rails4. To use it:
Model.where(col_1: SOME_VALUE, col_2: SOME_VALUE).first_or_create

ActiveRecord::Relation is now changed to #<ActiveRecord::Associations::CollectionProxy []>

– using of conditions while defining associations is no longer supported. Till Rails 3, one can use this syntax:


class Product < ActiveRecord::Base
has_many :suppliers, conditions: ["suppliers.status = ?", true]
end
# In Rails4, if you wish to use the same, you can use the below syntax:
class Product < ActiveRecord::Base
has_many :suppliers, -> { where("suppliers.status = ?", true) }
end

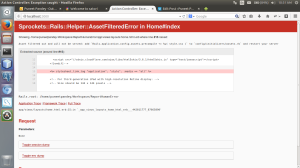
– Adding Stylesheets: If you’re trying to add any stylesheet into layout, You must need to add it under ‘config/initializers/assets.rb’
Rails4 shows it in a very beautiful way (refer to the attached screenshot)

assets handling in rails4

ActionMailer: deliver_now & deliver_later: Action Mailer is now integrated with Active Job so that you can send emails outside of the request-response cycle, hence the user doesn’t have to wait for the request to complete.

However, if you wish to send the mail straightaway, use deliver_now.

UserMailer.welcome_mail(@user).deliver_later
UserMailer.welcome_mail(@user).deliver_now